Tuesday, June 28, 2011

Yummy Honey Cookies and a Bee Birthday Party


Jennifer's Yummy Honey Cookies
Photo by Jennifer Leigh Photography
jenniferlphotography.com


We recently celebrated our youngest granddaughter's 2nd birthday, and our daughter Jennifer made these wonderful honey cookies.  She gave me permission to reprint her recipe here.  I hope you'll enjoy them with some little ones like we did.

Yummy Honey Cookies
Ingredients
1/2 c shortening
1 c creamy peanut butter
1 c honey
2 eggs slightly beaten
3 c flour
1 c sugar
1 1/2 t baking soda
1/2 t salt


  • Directions
  1. In a mixing bowl, mix shortening, peanut butter and honey. Add eggs; mix well. Combine flour, sugar, baking soda, baking powder and salt; add to peanut butter mixture and mix well.
  2. Roll into 1- to 1-1/2-in. balls and place on ungreased baking sheets. Flatten with a fork dipped in flour. Bake at 350 degrees F for 8-10 minutes. Squeeze chocolate icing into forked lines to represent bees.
If you want ideas on how to make a "Bee Birthday" party see Jennifer's website at olivebranchapiary.com.

Bee Skep Hive Pinata (do not fill with bees!) :-)


Wednesday, June 22, 2011

Honey Plum Chicken

From granny's cookbook
Honey Plum Chicken - doesn't that sound like something your grandma would call you? Honey plum.  Not my grandma, she wasn't one of those sugary old grandmothers, but she is the one that taught me to cook.


I loved her fried chicken, and that's the one thing I never learned to cook.  I always felt like my crust was either too hard and crusty, or I couldn't get much of a crust at all, but instead one of those greasy, barely brown ones.  I would either not get it cooked thoroughly, or it would be so tough that no one could eat it.  I can make oven-fried chicken, but I'm not thinking she would approve of that.


So when I was putting together this recipe, I got nostalgic for my old granny and got out her cookbook, which is the where the picture above came from.  It was written before I was born, and I get a chuckle out of the pictures in it, but use it plenty still. 


For your enjoyment, I give you Honey Plum Chicken.  I doubt granny would have liked it, because she would have thought it too fancy and gourmet--something she didn't take to (and neither does her son, my dad.) But my husband loved it.


Honey Plum Chicken
1 cut up chicken (I prefer thighs)
oil for browning chicken (olive or coconut is my choice, peanut oil sparingly)
flour, salt and pepper for dredging chicken


Dredge chicken in flour mixture, and brown on both sides in pan with oil.


Meanwhile, combine the following plum sauce:
1 16 oz can plums, or 4 small plums, cut into small pieces
Several squeezes of fresh lemon
1/4 c oil
3 T honey
1 T maple syrup
1/2 t ginger
1/2 c onion
1/2 c any juice


Pour off oil from chicken and add the above sauce.  Continue cooking until chicken is thoroughly cooked ( 20 - 30 min).  Sauce will thicken as it cooks down. 


Honey Plum Chicken

Thursday, June 16, 2011

Sheri's Honey Fruit Salsa


Sheri's Honey Fruit Salsa

One of the best things of summer is the cool, refreshing foods you can make that are the absolute easiest and fastest.

Yesterday, during one of the most gorgeous days we've had so far this summer, I came up with this fruit salsa made with honey, and paired it with cinnamon chips.  It could also make a great topping for salmon or other fish, added to a lettuce salad, or mixed in chicken salad on a croissant. 

As is in lots of my recipes, you can make this with whatever fruits you have on hand.  I used about 1/2 c each of apples, kiwi, plums, and peaches.  You could load it up with berries instead, or go for tropical with pineapples and oranges.  Your possibilities are only limited to your imagination.


Chop your fruit fine.


Next add up to 3 T of honey, 1 T of either maple syrup or molasses, and 3 T of a fruit jam.  I tried orange marmalade, my own blackberry jam, and something cool called bakeapple jam from our friend, Dr. Dan, who brought it to us from Newfoundland.  It's all good!


The cinnamon chips are easy.  Cut flour tortillas into wedges.  Spray on a butter flavor cooking spray, sprinkle on cinnamon, and spray again.  Put in oven for a few minutes until toasty and crunchy.


Dish up salsa and place on a serving dish, surrounded by chips. We enjoyed this dish with our meal, but it would be great for a snack with an ice tea, or taken along to a barbecue.


Enjoy!


Sunday, June 12, 2011

Mint Ice Tea with Honey

People are intimidated adding anything to sweeten drinks but sugar.  But you have to get over that and learn to add honey or maple syrup to your drinks (if you need it at all!).  It is easy to use honey and I'll explain how.


Mint is an easy plant to grow.  In fact, it's too easy to grow---it can be an invasive plant if you don't use a barrier of some sort in the ground to stop the excessive growth of this plant.  We brought a small, small clipping home from some Amish friends of ours and in only two years time, it has just about overtaken our herb garden.


It is a simple process to make mint tea.  After cutting off a bunch of it, wash it thoroughly.  I know some don't think this step is necessary, but I have just enough "city" in me to know that if my lawn furniture needs a daily washing of bird poop from fly-overs, my mint probably does too.  I spin it dry in a salad spinner, or you can let it dry naturally.  The fresher your mint is, the more flavorful it is, and the darker the color becomes.


I boil  about 2 cups of water and throw the leaves right in, taking off the heat and letting it steep.  You can also pack a tea ball with the leaves or put them up in a bag that you place in the water.  In fact, you can even omit the whole boiling thing if you want.  You can place the leaves directly in tepid water, and let it sit.  Occasionally stir up the leaves, squeezing them somewhat until you get the desired color.


Mint tea can be very dark if you allow the leaves to boil in the water.  I don't, letting it steep in the water, and obtaining a more natural "minty" color. When you have the desired steep-age, I filter the leaves out of my water and pour the mint water into a gallon glass jar.


Next, I add the honey.  There is a trick to getting the honey stirred into the water.  I first make a "simple syrup" out of it by simmering about 2 cups of water on the stove and then adding anywhere from 1/2 c to 1 c of honey to it.  It will dissolve in the warm water and can now be easily mixed into the mint tea mixture. 


Add water up to a gallon, add ice, and garnish with fresh mint leaves.  Delicious!


For hot tea, put mint leaves in a tea ball, place in your mug, and pour boiling water over the top, allowing it to steep for several minutes.  Add honey directly into the hot tea in mug. 


Thursday, June 9, 2011

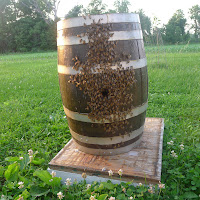
A Barrel Full of Bees

A whiskey barrel full of bees
Here's an update on what's going on at the Burns farm now that summer is here.


It's been hot. And I mean hot.  Today hit at least 90 degrees, and funny enough, down south in Louisiana where David's brother lives, it was several degrees cooler than here in Illinois.


But I'm loving it, even if I won't love the electric bill when I get it next month.


A lady in the area called and said she had some bees land on a barrel in her yard, could we come and get it? David drove off, thinking that probably by the time he got there, the bees would have flown on.  But a little while later he came back with this whiskey barrel packed full of bees and comb and honey.  It makes for an interesting conversation starter, but we don't know how to get into it. We hate to destroy their home, so for now, we'll just leave it be.


My garden is up and going.  I didn't try nearly as many new things this year as I had planned, but with this time of year being our business season, I was lucky to get anything at all
planted.  We have already had salad from the garden and all
the herbs we want.


A swan family


This evening we went over to a local conservation area and took a nice walk.  Earlier in the month Christian and I had gone there and found a swan nesting on some eggs. I was figuring the little ones had to be born by now, and I was right and rewarded when they all swam right up to us on the dock--just as if they had been waiting on us to return.
A beautiful sunset


We took a few shots of the gorgeous sunset before we went for ice cream.


A summer day in the country with friends


Children and grandchildren alike have been enjoying our yard. I ended up with a little extra money I wasn't expecting, and had the option of getting new kitchen cabinets or a swing all the kiddies could enjoy, so guess which one grandma chose to get?


And finally, one last picture to sum up all our summer memories combined.  Nothing says summer more than a little boy, in only his shorts, in a playhouse, eating Doritos, watching the bubbles float by.  True bliss. Wouldn't you love to be this carefree? I hope you have a good summer too.


A lazy day in the queen yard


Friday, June 3, 2011

My New Adventures with Old Mason Bees

One lone mason bee getting to work
I have had the funnest time with these mason bees.  Actually, I should say mason BEE, because I have only had the pleasure of having one gal move into the condo for them on my porch.


As you may recall from an earlier blog, I had set up this house for mason bees back in April, and had put out the 'egg tube' and saw several bees hatch out of this tube the next day or two.  After the wind took them off to regions far flung, I never saw them again.   I contacted the fellow I got them from, who said just wait and they will come back. 


And,  along came one little girl back, who in the past week or two has worked her little hind end off to fill up 3 of these little tubes full of eggs for next year, all the while, I am assuming, pollinating things about the yard?  I don't know, but it was fascinating watching this one bee go in and out all day long, filling these tubes with pollen and mud and eggs.


She is no longer with us.  Mason bees live only about 6 weeks and then all die, and since I put out her original tube and she hatched in early April, and it is now June 1, I can safely surmise that she has passed on to glory.  But she did leave behind a legacy of eggs that I will carefully tend to, let hibernate this winter, and then bring back out next April, and let hatch in their mother's condo. I did have fun watching her up close, taking pictures of her, and at one point, she actually landed on my arm and walked around a bit while I was demonstrating the mason bee house to some customers--what an advertisement!


A queen of her own castle